In late 2008, in an effort to get myself playing more games, I decided to play all 52 scenarios from Scenarios For All Ages by
Charles S Grant and Stuart Asquith. More than that, I decided to play them in order, 1 a week, starting on Nov 5. I knew I wouldn't
manage to play every week so I set a deadline of Dec 31st 2009. With a little help from my friends, I made it with a day to spare.

In the end, I played 52 games in 60 weeks. 34 solo games, 15 face to face games, 3 Play-by-Email mini-campaigns
17 other gamers from 4 countries participated, (Canada 11, US 4, Ireland 1, Argentina 1)

11 'periods' were played - 20/25mm Ancients (3), Prince Valiant 40mm skirmish (9), 40mm 16thC (10),
40mm semi-flat War of Polish Sucession (1), 40mm AWI (2), 40mm Pirate
Skirmish (5), 40mm early 19thC fictional (17), 15mm ACW (1), 25mm Zulu War (1),
20mm WWII (1), 20mm 1960's fictional (2)

I posted a brief report on each game on my webpage. I am shutting down my website so I am re-posting
the reports here, starting at Game #52 so that they will eventually appear in order. The reports were written in a variety of voices and tenses (sometimes all mixed together!) and it was tempting to rewrite them but I have left them as they were originally written with only very minor corrections, particularly to things like links.

To avoid copyright issues and save myself work, I have not given the details of the scenarios. Having a copy of the book will help make sense of the reports. The book may currently be purchased from John Curry at http://www.wargaming.co/ as well as from booksellers like On Military Matters and Caliver.


Monday, October 17, 2011

5 Nov 2008 Scenario 1: Attack on a Prepared Position.

This game was played between myself and Gary McMahon using my 40mm 16thC English and Scots and Rough Wooing.
The English under the Earl of Bedford (aka Gary McMahon) arrayed themselves with archers and artillery spread across the centre of the ridge line and the billmen clumped behind the crest on the left of their line. (3 inf +1 lt inf + 1 arty translated into 2 Battles each of 4 bills, 4 bows and 1 gun ( 1 company of bows being replaced by a company of arquebusiers)

The Scots under the Earl of Lennox (aka me) marched on along the road. 6 inf, 2 lt inf, 1 cav and 1 arty being translated as follows: Lord Home's 4 companies of border horse leading followed by the Campbell with 6 companies of highlanders, then the Earl with 6 Scots pike and 2 arquebusier and finally the Rhinegrave with 8 Landsknecht pike and 2 arquebusiers and 2 light guns all in French pay.

Lord Home advanced on the hill but was twice driven back by bow and cannon fire, finally succeeding in working around the English left. The Highlanders then deployed and stormed the hill. Lightly armoured, they fell in heaps under the arrow storm but enough of the chieftain's household remained to sweep away the archers and over run the guns before collecting their wounded (and spoils) and returning to camp. At this point, the Earl of Bedford led his sturdy billmen over the ridge. Lennox deployed his pikemen to face them while his arquebusiers skirmished forward. Evening was drawing nigh (Turn 9 of 12) and the English had high hopes of holding till dark but outnumbered 2 to 1 with their archers scattered, the English foot faded away into the shadow of the woods.

12 Nov 2008 Scenario 2 Threat to the Flank

This game was played between Gary McMahon's 25mm Imperial Romans and my 25mm Persians masquerading as Sassinids using Warhammer Ancient Battles.

An Imperial Roman force under Garius Maximus defends a river crossing in Asia Minor. The main force will be composed of 1,000 pts plus a free general & army standard with an 800 pt detachment. The attackers will be 'early' Sassinid Persians under Rossaphernes cobbled together from existing figures and judicious use of the Persian list from the 2nd ed of WAB. so no Cataphracts for now and my Clibinari will have thrusting spear instead of kontos. A general and army standard with 1,600 pts in the main force and 800 pts in the flanking force. Keeping to proportions of cavalry and infantry in the scenario won't be easy with Sassinids but luckily the latest research indicates that the Sassinids had regular infantry in addition to levies. As it turned out the Romans deployed 2 cohorts of infantry and 1 of archers and an alae of cavalry at the ford and sent a 3rd cohort plus archers and a double alae of cavalry to block the bridge, The Persian flanking force was 1 unit of Clibinari, 1 of allied horse archers, a unit on mountaineer (using the marine stats) and a unit of levy archers. The main force was a large unit of spearmen and another of archers, a large unit of mercenary light infantry,2 units of skirmishers, an elephant and a unit of cavalry with bow and spear.

Things got off to a good start for the Persians. The first volley of arrows routed the Roman archers at the ford exposing the legionaries. The Roman cavalry trotted forward and were wiped out by one close range volley from the clibinari and horse archers combined. One cohort charged forward and swept away a unit of slingers but that brought them into close range of the massed archers and it was a small remnant that fell back in good order onto the hill. Over the bridge the Persian cavalry charged and broke the Roman cavalry taking the archers with them. By end of turn 4 it looked in the bag.

The horse archers completed crossing the river and surrounded the remnants of the cohort that had marched to the bridge while the mercenaries broke into skirmish order and along with the heavy cavalry crossed the river into the gap left by the Roman cavalry. The spearmen and elephants moved forward as well. Suddenly the Roman cohort demonstrated the advantage of well trained troops, turned and charge the horse archers, with no where to flee to they unleashed their weakest volley of the game and were broken, every unit of skirmishers within range panicked and ran as well.

The clibinari charged the flank of the victorious legionaries but they must have been dismayed, 6 charging spears only managed to down 1 Roman and the 8 remaining legionnaires stood. The Persian lights rallied but dusk was falling and their spearmen were barely 1/2 way across the river. Barely 30 Romans remained in 3 battered cohorts backed by a few archers but remain they did and the Persians had failed to breakthrough before dark.

In retrospect, I had failed to keep track of time and waited too long before launching my spearmen and elephant forward to exploit the effects of the archery. The early success seem to have lulled me into believing that my cavalry and light infantry could do it all themselves and even there I had left it till the last possible turn and gotten careless with my horse archers as well. Gary seized the moment and his counter attack secured the ford till dark.

5 Dec 2008 Scenario 3 Disciplined vs Irregulars

This game was played solo using my 40mm 16thC English and Scots armies and Rough Wooing.
I decided to pit the firepower of veteran English longbows against Scottish levies using 2 stands per unit.
The English consisted of: a General with his bodyguard of Pensioners, a Captain of lancers with 2 lancers and a border horse, a Captain of bills with 3 armoured bills, 4 bows and a light gun, a Captain of light infantry with 2 bows and a company of arquebusiers and a spare card to level out the deck and allow them to pass once per turn if though advantageous.

The Scots had a General and 5 companies of pike with 2 shot, a Captain of lancers with 1 lancer, 2 border horse and 2 mounted arquebusiers (well the scenario said the irregulars had 1 mounted unit with missile weapons and that's what I had), a Captain and 5 companies of Border horse and a captain with 9 companies of highland swordsmen.

Things went badly wrong for the English in turn one and went down hill from there, dice, cards, everything seemed against them while the Scots could do no wrong. Even the parties of light horse sent on a wide flanking movement passed every control check. The Scots cavalry overran the English horse then the general, the Highlanders took on and broke the billmen, while the flanking horse rode over several archers and into the limbered gun. It took barely an hour to reduce the English army to a few scattered remnants.

In case it was a rules problem (or, perish the thought, prejudice) I replayed the game using the same broad plans. This time the Scots stalled when out of command control and the English archers plied their bows with effect. A clash of cavalry destroyed both parties leaving the way open for the Scots pike to charge head on into the Bills. In a flurry of dice, the General and 1/2 the pikemen went down. The English archers stepped up and supported by the artillery cut down the Highlanders in swathes then turned their bows on the border horse driving them off. The way was clear to march on with serious but acceptable losses.

10 Dec 2008 Scenario 4 Encirclement or Breakout

This game was played solo using my 40mm 16thC armies and Rough Wooing 

I decided to stay with the 16th C, pitting English vs French on the continent to test the revised rules. Each scenario unit was replaced by 4 companies of infantry or cavalry or 1 gun. The English were in the middle with 4 Battles, after dicing for deployment of battles their army began as: In advance: 4 Border Horse, on the right: 4 Bills & 4 Bows, on the left: 4 Bills, 4 Bows & 1 light gun, in the middle: 4 Demi-Lancers inc the General. In similar fashion I formed the French army then dice for the placement within each force. Force 1: Left: 6 Levy Pike & 2 shot. Right 4 Light Lancers, Force 2: In advance & to the right: 4 Gensdarme inc General, 2 mounted arquebusier, 2 reiter, behind and to the left: 4 pike, 1 crossbow, 2 shot, 1 swordsmen, 1 light gun. Force 3: 6 pike, 6 shot, 1 heavy gun. Forces 2 & 3 were beyond "detached" and had to take a control check each turn, all 3 Captains rolled "Bold". I was going to roll for battle plans but the point of escape seemed so obvious for the English that I just went for it and rushed the French up as quickly as possible.

The game began with the English light cavalry quickly moving to face the French light lancers, the left hand infantry backed them up, the demi-lancers faced the French main body while the right hand infantry began a slow retreat facing the enemy. On the 2nd turn the light cavalry clashed shaking both bodies but driving the English back.

Arrows drove off the remnants of the French lights leaving the way open for a clash of Bills vs Pikes. Despite the depth impetus, the pikes were driven back but then dug their heels in and the melee continued for several turns. The French Gensdarmes crashed into the English cavalry but got the worst and were driven off. Turn after turn, the main body of French Landsknechts stalled but finally they got in motion, deploying the artillery on a hill and pushing some skirmishers forward. A brisk skirmish action across the entire front went on as the English slowly backed up, archers evading the occasional charge, the reiters did follow through onto the bills but were repulsed. Once a company of bills from the Right Battle moved across and outflanked the French Pikes, they finally broke and ran leaving the way open for the English to retreat off table.

The English lost 7 companies out of 25 so technically it was a draw but given the bloody nature of the rules I can't picture how they could have gotten away with much less so have awarded them a marginal victory.

17 - 19 Dec 2008 Scenario 5: Fighting in an Urban Area.

This game was played solo using 19thC fictional armies using Hearts of Tin rules.


Since there is a Victorian look to most of the buildings I have, the mid-19thC seemed appropriate so it's off to the town of Wye on the edge of the Origawn Territory. The Red Queen's forces consisted of 2 brigades, one with 2 battalions of regular infantry, a battalion of riflemen and a field gun, the other with a battalion of incorporated militia, a battalion of volunteers raised largely from sailors, and a field gun. The scenario allows for 3 mines, one on a bridge, I meant to dice for their location but despite fielding an Engineer Officer, I forgot about the mines in the heat of battle!

The Blue forces consisted of 3 brigades, on their left, 2 regular battalions, a battalion of light infantry and a light gun, on the right, 2 battalions, a battalion of riflemen and a heavy gun and in reserve 2 battalions of regular infantry, the blue guard and a heavy howitzer. There was also a brigade of cavalry which stayed off table, there being no room for a cavalry charge on the narrow, barricaded streets of Wye.

The game began with a brisk push up either bank of the river which resulted in various detachments of riflemen and sailors being evicted from the houses on the north shore after a short fight. Blue deployed their artillery to fire across the river then proceeded to throw column after column over the bridges. For a while it looked like the task was impossible but then the Blue Guards were brought forward and crashing into the militia, sent them reeling. In short order the guards had cleared the western quarter.

On the eastern side, a prolonged barrage backed by sharpshooting from the riflemen finally weakened the red infantry enough to allow Brigadier Scott to lead a successful charge over the East bridge while the tattered remains of the sailor's battery at Central Bridge were simultaneously over run. Red's forces fell back and regrouped by the church as a messy street fight developed. Casualties had been high but Red refused to give in and eventually Blue's units started streaming back in disorder, refusing to rally and renew their charges and even the remains of the Blue Guard were wavering when Scott was struck down trying to lead the remnants of the 4th Infantry in one last charge. It was too much and General Ross reluctantly ordered a retreat.

31 Dec 2008 Scenario 6: Rearguard

This game was played solo using 19thC Fictional armies and Hearts of Tin rules.

I thought the next game would have to wait for the new year but I suddenly found 3 free hours on New Year's Eve afternoon. Blue's rearguard set up with 1 battalion split between garrisoning the town and formed in support in behind, 1 battalion on the hill to the west, the light infantry on the hill to the east, the artillery in front and the cavalry in reserve. Red began with the Lancers and Bodyguard on table.

They worked their way around the western hill and soon the Bodyguard and Tigers clashed yet again. In a flurry of charge and counter charge, the Tigers were driven from the table (again! I'm not sure if they have ever survived a battle) but the bodyguard was reduced to a rump which dismounted as a garrison for the farm by the exit point. The Lancers took up a position behind the town and watched. Both sides watched the north and waited, and waited.

Finally on turn 6 the first Red infantry arrived followed on turn 8 by the main body. The 1st Brigade advanced over the hill with Blue's 3rd Infantry retreating slowly before them. The 2nd Brigade drove straight forward into the town while their skirmishers worked their way east of it sparring with Blue's skirmishers. I was perhaps a little tired but with Red's infantry, outnumbering Blue 2 to 1, with the Lancers behind Blue and the farm by the exit which had been Blue's planned fallback position manned by Red's dismounted cavalry, I could think of no clever plan so Blue's infantry and artillery stood and fought. By turn 17 all that was left were the skirmishers clinging to the Eastern farm. Red's 3rd Brigade and cavalry had by passed Blue and exited followed by one of the 1st Brigade battalions on Turn 18 sealing the victory.

14 Jan 2008 Scenario 7: Hot Pursuit

This game was played solo using 40mm fictional armies and Hearts of Tin rules.

This scenario seemed perfect for the 16thC Scottish Border Country so I played it out using Rough Wooing but it was on the small side and over in under an hour with Scots escaping with nearly enough troops to count as a victory. So, I decided to reset and play again 1st with MacDuff in the War of 1812, lack of cavalry seriously hindered the British and the US forces marched off with barely a casualty. A sharp clash where the 2nd NY Dragoons routed some Canadian volunteer cavalry early on being decisive.

So I reset Red & Blue and played again using HofT and my glossy toy soldiers. This was the hardest fought game with Larsen's Lancers outflanking the Blue army, catching the 2nd infantry in march column, scattering them and capturing Brigadier Zinn (He can be seen being escorted off the field at left). A subsequent charge onto the 3rd Infantry was repulsed but they earned their pay. The 1st Dragoons repulsed a charge by the Queen's Hussars then fell back but the 2nd Dragoons were caught by the Director General's Bodyguard and cut to pieces. The FTC Rocket Horse Artillery battery was particularly effective, pounding Blue's artillery then catching a troop of dragoons bunched up in the narrow streets of Foamcorburg and dispersing them but the coup de grace came when the Green Tigers stormed up the road through the smoke of the rocket explosions, catching General Scott by surprise and taking him prisoner as well. Another victory for the Red Queen's forces. Has the tide turned?

21-22 Jan 2009 Scenario 8: A Vital Bridgehead.

This game was played solo using 40mm 19thC fictional armies and Hearts of Tin rules.

I wanted to play this on my 6'x8' table but life interfered so I squeezed it onto my temporary 5'x6' table.
The battle began well enough for Blue, the 1st infantry coolly forming square to repulse a cavalry attack then deploying into line unleashing some deadly volleys into the Buffs. As Red continued to build up their forces, they could make no headway, even their rockets doing more damage to friends than the enemy.

Behind the lines, the evacuation began smoothly and the engineers began work on a redoubt but as the new steam tractor puffed over the bridge, it hit a rut and threatened to roll over. Four turns passed before the bridge could be cleared. By this time the pressure was building on Blue's front line and it started to withdraw but too late! The rocket battery finally found the range just as the Queen's Rifles cleared the village and opened up on the 1st Infantry. As they staggered from the sudden heavy casualties the Bodyguard charged in and the line broke. Pursuing through, the Bodyguard crashed into the newly raised Frontier Horse but wielding their rifles from the saddle these fought them to a stand still. There was no room for these bold horsemen to retreat to so a swirling melee ended in their annihilation as a fighting unit. Covered by the Frontier Horse, the remnants of Blue's advance guard pulled back closely pursued by Red's infantry.

The engineers in town finished a fine redoubt then belatedly remembered their main purpose. As the light faded, the last wagons cleared the bridge followed by a handful of stragglers, a few light infantry, 1/2 a battery and a couple of battered companies of infantry as the remnants of the 3rd Infantry rallied in the streets and prepared to try and hold back one more charge to give them time to get away. Behind them, the engineers cleared the bridge and lit the fuse. A massive explosion threw up clouds of dust and shook the bridge but when it all settled, the bridge still stood.

28 Jan 2009 Scenario 9: Tables Turned!

This game was played using 40mm Homecast War of Polish Succession figures and Hearts of Tin. using HofT.


The game began with the Moravian Hussars supported by Saxon Dragoons hotly pursuing Saxe's Lancers across the plain. The Russo-Saxon's won the initiative and charged. The lancers had 2 choices, evade or turn and fight, comparing the Hussar's movement dice to the gap between them, they needed to roll an 8 on 2 dice to escape so they risked the 50% chance to turn and form line. It turned out to be a poor choice as the Hussars hit them stationary and broke them. At the end of the turn the French Heavy Cavalry appeared, 1 to the right of the lancers, 2 to the left, none of them appeared behind the allies.

The allies pulled back swiftly next turn and it looked like they might escape almost unscathed but then fickle luck smiled on the French, they seized the initiative and rolled well for movement, the Orleans regiment deployed into line and headed straight for the enemy with Fitzjames moving to support them while the Colonel General Regiment sped past the town to cut them off. The Saxons choked on their movement and were now within 9" of the enemy so could only retire at 1/2 speed. On the next turn, the initiative switched back but the pincers were closing and there was no way to ride out without a fight. The Saxons deployed 3 troops to face the Colonel General while 2 moved to form a reserve for the Hussars. Orleans spurred forward and were met by the hussars led by their Brigadier. Carnage was heavy but the melee was drawn.

There was now hope that they could disengage but the initiative shifted again and in the ensuing melee, the French heavy cavalry cut up the hussars and sent the remnants fleeing. The Saxons braced themselves but having inflicted nearly 40% casualties on the enemy, the Chevalier reigned in his men and rode to the inn calling for wine.

4 Feb 2009 Scenario 10: The Important Bridge

This game was played solo using 40mm 16thC armies and Rough Wooing

It was back to Scotland in 1547 again for game 10. The French were Blue, the English, Red. I placed 3 companies for each scenario unit. I was short on Gensdarmes (hence the embarrassing temporary bases) so the English got lancers for heavy cavalry and Border horse for mediums. The French rapidly advanced and seized their side of the bridge while their Scottish allies closed in on the far side. The English led with their cavalry which chose to ford the river while their infantry went straight for the bridge.

The English border horse appeared early and clashed with the Scots border horse, both battles being effectively destroyed, the remnants eventually retreating without taking further part. The English cavalry, having moved beyond command range, stalled and suffered heavily from the Landsknecht arquebus fire. The Scots advanced rapidly and the Highlanders getting out of hand, moved through the wood and charged the English archers driving them off before falling back to the woods, hotly pursued by the Red coated Bills. Meanwhile the White coated 2nd English battle arrived and deployed to face the Scots. After a flurry of arrows which did serious damage to the Scots pike, the Bills charged forward driving the Scots back and cutting them down.

On the far side of the table, the French cavalry slowly moved around the wood and dispersed the remnants of the English cavalry then splashed across the river to attack the English archers and artillery. The river must have been deeper than it looked as they also had trouble crossing and suffered heavily from bow and cannon fire. Seizing the opportunity, the English foot charged across the bridge and drove back the German pikes but eventually the losses to arquebus fire, push of pike and lances shook the battle and it retreated. The French cavalry attacked and drove off the remnants but were themselves shaken by losses and retreated off table. Undaunted, the Whitecoats, having driven off the Scots, splashed across the river and attacked the Germans in the centre. After a series of charge and counter charge interspersed with volleys of arrows and arquebus and cannon fire, both sides suffered heavily but the German mercenaries cracked first and the English were left in control of the bridge. Sighhh, I was so sure my Scots and their allies would win this one.....

18 Feb 2009 Scenario 11: River and Land

This game was played solo using 40mm 19thC fictional armies and Hearts of Tin rules.


This game was rather cramped on my smaller table and I accidentally made it worse by laying the river slightly off center on the wrong side so that there was little room for maneuver. I decided to play Red and diced for Blue's deployment which more or less decided their plan of attack. On reflection I would have done better to command Blue's attack.

I also started the gunboats off table and diced for their arrival. Blue's boats were fighting the current and rolling poorly to boot and were barely 1/2 way across the table when the gunboats arrived and opened fire on the schooner with deadly effect, sinking her in 3 turns. The longboats crammed with privateers had 2 choices, land behind their own lines or run the fire and try to board. On their first attempt, they were repelled by fire and 1 boat load fled the table. The remaining boat was fierce however and, helped by fire from batteries on shore which silenced the FTCS Reuse, driving her from the table, they boarded and took the FTCS Recycle. This success was short lived however and cannister and rockets from Red's artillery cut them down and they leapt back into their launch and fled downstream in their turn.

On the right bank, after a short sharp firefight in which the Victoria Rifles drove off the San Carlos Volunteers, the battle settled into an inconclusive long range duel of rifle, rocket and roundshot. On the left bank, Blue's infantry advanced in line and engaged in a prolonged exchange of musketry in which the 1st Infantry and Green Tigers mauled each other while the artillery dueled over head until Red's battered guns were forced to pull back. Eventually the young Buffs were also reduced to 1/2 strength and had to withdraw as Blue's reserves came forward. The game was basically a bloody draw but the price of the village was too high and General Sloidh ordered a withdrawal while his forces were still in fighting order. (Rolled a 2 on army morale.)

26 Feb 2009 Scenario 12: Fighting Across The River

This game was played between Gary McMahon using my 25mm Achamenid Persian vs his 25mm+ Assyrians using Warhammer Ancient battles.

We cut out a 6'x8' section of Gary's table to play this on. Looked like a verrrry long stretch of river to Rossius, King of Hants. My army consisted of 1 unit of 9 cavalry and 6 infantry units with 18 figures in each. I placed my Immortals at the right hand ford supported by slingers. Two units of Persian foot guarded the left hand ford, stretching in towards the center. Some Saka foot with bow and axe occupied a hill in the center while some Bythnian peltasts (javelin and rhompaia) and the cavalry formed a mobile reserve. The motley horde of Assyrians and allies came pouring through the gaps in the woods, cavalry, cart mounted archers, auxiliary warbands and skirmishers on their right, heavy infantry and skirmishers on their left.

 With 2 armies of archers, the arrows darkened the skies but as usual in WAB, to little effect, some skirmishers were chased away temporarily but no major units cracked. I delayed on planting my shield barrier in case I needed to maneuver but Gary decided to concentrate and come straight at me, counting on superior numbers to break my line and open a hole for his cavalry to exploit. Once his massed archers got in range, my unarmoured infantry started to drop alarmingly so I planted my shields and this miraculously increased their defensive value enough to balance the numbers (a questionable rule at best). As darkness fell, the Assyrian Guard Cavalry passed through their skirmish line and splashed through the ford to hack at the shield wall. This went on turn after turn with the Persian spearmen more than holding their own but the cavalry sticking it out. As the Assyrian center thinned, I brought up my cavalry and Bythnians and sent them across the river just as a massed Assyrian archer unit in the center broke under fire, taking the general with them. The Assyrians weren't coming across today.

12 Mar Feb 2009 Scenario 13: Finding the Ford

This game was played in Port Deposit, Maryland, between myself and Rob Dean using our 40mm 16thC armies and Rough Wooing.

This game gave us the chance to pit my English against Rob's French for the 1st time in 4 years. The ford turned out to be in the middle, beside the bridge, and by turn 2 both sides had found it. This put paid to any element of deception and the struggle for the ford became one of brute strength across a ford only 1 stand wide (we diced for width).

An early attempt by the French cavalry backed by crossbowmen and arquebusiers had some success but they were eventually sent packing and then English bowmen dominated the ford. The combination of bill and bow was able to hold the ford but was unable to make headway against the heavily armoured French Gensdarmes who awaited them on the far shore.

 The cannon on the hill and some mounted arquebusiers were brought to bear on the problem and a gap opened, wide enough to slide some light infantry through. These were able to eliminate the enemy battery but were themselves driven off. Slowly the rain of missile weapons took its toll on the gensdarmes and at last only the Captain stood, single handedly holding the ford against the English infantry, (making every save and passing every Shaken Control Check!). As the infantry fell back and made way for the English horse, the cannon barked again and at last the brave Chevalier fell. The English cavalry splashed forward driving off a thin screen of light troops as the French pikes began to fall back, ceding the ford.

12 March 2009 Scenario 14: Dry River Bed

This game was played in Maryland between Rob Dean's 1/72nd Egyptians vs Norman Dean's 1/72nd Hittites using Warhammer Ancient battles with myself as GameMaster.


This was the first battle between Rob Dean's fledgling Egyptian army and his son Norman's gathering Hittite horde. Norman was the defender and decided to lure the enemy forward by placing his 3 spear units out in the open screened by skirmishing archers. His chariot units and a small auxilliary warband were hidden in a gully that ran at right angle to his line on the left. Rob deployed with a small unit of chariots on either flank supported by skirmishing Nubian archers with massed archers, sea people and some slingers in reserve.

All was well as the Egyptians marched forward until the hidden warband became inpatient and surged forward without orders. Norman decided to send his 1st Chariot unit forward since his cover was blown. Faced with a rattling horde of chariots appearing out of no where, the Egyptian chariots chose to evade. Unfortunately this took them past the Hittite archers who shot one down. Under the rules, there were now too few chariots to rally. (oops, bigger units next time.) The small warband chased off the Nubians but came to grief when it came up against some sea people mercenaries moving forward from reserve.

The next phase of battle now involved an attack by more Egyptian chariots supported by bowfire against the Hittite spearmen. Under the shower of arrows, the spearmen faltered and broke but rallied before the chariots could exploit the opening.

While the rallied spearmen advanced all along the line, the Hittite chariots chased down the enemy general. The extra crew and long spears proved crucial and the remnants of the Egyptian force fell back leaving the desert to the Hittites.

31 Mar 2009 Scenario 15: Forlorn Hope (1)

This game was played solo using 40mm 19thC armies and Hearts of Tin.

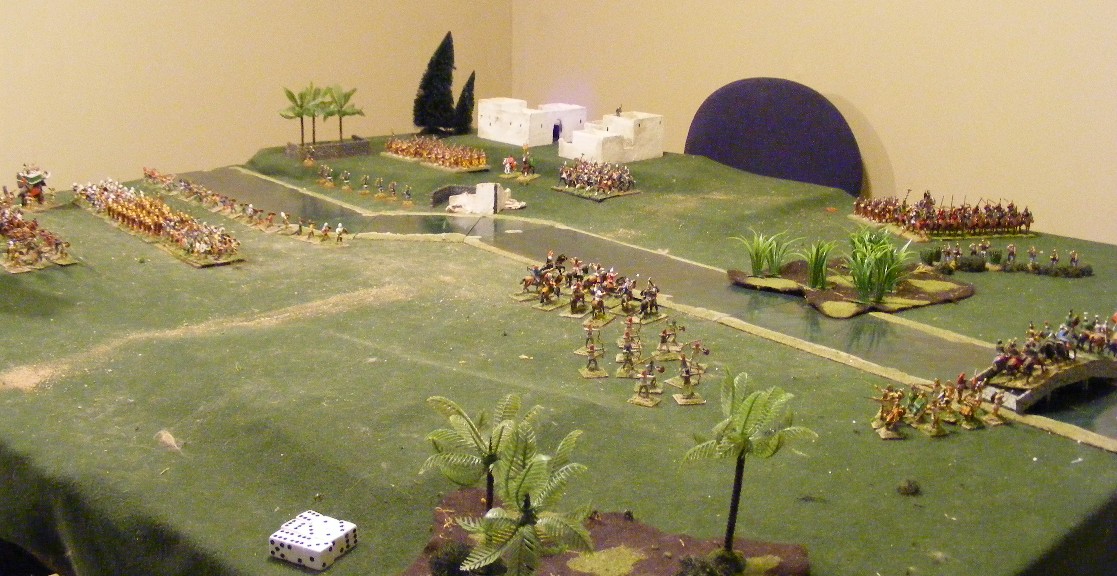
I'm still gathering forces and working on the background for my Red vs Blue campaign so technically haven't started yet but it seems to be developing a storyline all by itself. After the surprise appearance of Pirates as Blue allies in #11, an attack on a fortified city suggested a punitive expedition by Red, so instead of trenches and breaches its a surprise attack from the jungle at 1st light: the escalade of Freeport. The pirates had 1 unit spread out along the wall in detached companies with a heavy battery in the stone tower guarding the log boom blocking the river. A 2nd unit was asleep in town as well as the Grenadiers of San Carlos who had volunteered their services to defend the town. I counted the pirates as Veteran Militia. Apparently there are some religious issues as 2 armed Franciscans were serving as aides to Captain Mulrooney, the Pirate chief.

Red had 2 storming parties, one with 3 ladder parties, all grenadiers, and a company of rifles led by Brigadier Macfarlane, the other with 2 companies of grenadiers, a company of rifles and an Engineer with petard, all under the command of Brigadier Grey. The back up force under General Turner comprised the Rocket Troop, FTC Horse Artillery and 2 battalions of foot as well as the gunboat FTCS Recycle with a heavy mortar.

Grey's party managed to creep within 6" of the gate before the alarm was sounded but the laddermen, no doubt slowed by their burden, were not even 1/2 way from the edge of the jungle. As the alarm went up the rocket troop galloped forward and opened fire as the Recycle steamed into view. In short order, the surprisingly accurate rocket and mortar fire had silenced the Tower Battery (accurate if not counting a rogue rocket that just missed the Tigers!). Meanwhile Gray's grenadiers charged forward and engaged in a desperate close range firefight with the defenders while the Engineer struggled with his charges (tied melee) but at last the fuse was lit, the door blown open and the forlorn hope entered. Now where were the relief's?

There had been some confusion in the jungle and the Tigers were not even 1/2 way there so Grey sent 1 company to seize the rampart above the gate while the other held the door itself. Over on the wall, the 3 ladders went up but resistance was surprisingly fierce and 2 of the 3 parties were thrown back. The 3rd company was undaunted and clung to a narrow foothold.

The Buffs were quickly at hand and started feeding men up the ladders into the fight under a withering flanking fire. Macfarlane spotted an empty stretch of rampart and led the closest ladder party to it to effect a lodging, eventually reinforced by riflemen and some Buffs. Inside, fierce and bloody fighting reigned as the pirates and San Carlos Grenadiers struggled to evict the enemy but eventually, despite local, temporary victories, their casualties were too high and they fled back through the town, leaving it to its fate.

1 Apr 2009 Scenario 16 Forlorn Hope (2)

This game was played solo using 40mm 19thC armies and Hearts of Tin.

This game was a pretty straight forward set up with the Red Queen's forxces taking the role of Blue (?!) and vice versa. Both Forlorn Hopes managed to creep forward, through the abatis and rush the ramparts before being seen. The left hand redoubt was overrun and, the occupants evicted. They rallied and counter attacked but were driven off and dispersed. The right hand redoubt proved tougher and the sentries managed to hold until the canon crews and reserves could be turned out. A vicious close range fight ensued and despite being reinforced, the forlorn hope was wiped out and the attackers repulsed. This cleared the way for Red's artillery to open up. The first salvo of rockets was spectacular 3 ones! They burst in a wide pattern, one landing on the main Blue position indicating perhaps an error in targeting rather than an erratic rocket! The Queen's rifles closed in with a heavy fire as the artillery continued to pound the redoubt. Once the Buff's were rallied, they rushed the redoubt again and carried it against feeble resistance.

By this time Blue's main force was alerted and 2 battalions rushed to the rescue. Pounded by artillery and shot up by rifle fire, they momentarily faltered, then rallied and rushed the redoubts. The left hand redoubt held easily and the counter attackers broke and ran for cover but the Buffs did not fare well, with their Brigadier shot down they allowed themselves to be evicted yet again.

General Turner himself rode forward and ordered the Tigers to leave the left hand redoubt to a company of rifles and advance to capture the right hand redoubt again. Supported by rifle and artillery fire they stormed forward and drove out the last few remnants of Blue's force.

13 Apr 2009 Scenario 17. Last Stand

This game was played by Ron Porter and myself using Ron's 25mm Zulu War figures and Colonial Adventures from. 2 Hr Wargames.

I took command of the Zulu forces. Surveying the scene, I decided on a rather conventional deployment sending out 2 units of rifle armed warriors to pin down the fort while 2 horns each of 2 units deployed left and right to encircle the enemy. That left 2 units of White Shields in reserve in the center. Things started off smoothly enough until a company of Ghurka's emerged from the wood on the British left and open up as my impis crossed the river. We fumbled a bit with the rules but eventually settled on interpretations that suited us and settled to it as volleys crashed out, downing a few zulus and driving even more away but they couldn't stop the charges from coming in. They were able to hold them though and it took almost the entire game before the last Zulu was downed. His 1 unit had tied down 3 of mine but for each of us that was about 1/3 of our forces.

In the centre, my rifles proved embarrassingly effective, even against the walls. Due to a quirk in the rules and the numbers and situation etc, the fewer men Ron used to man the walls, the more I was able to hit but those men were needed elsewhere and so eventually the wall was open and I sent in the loins.
On my left, the charges came in as planned and a prolonged melee started. Turn after turn we hammered until finally the last surviving Royal Scot, the company commander, fell under a hail of blows. Actually we found him still standing in a corner of the building when we cleaned up and there was some talk of his having crawled under a table!

This left a company of Sikhs and a gatling gun to defend the last part of the compound. As one unit surged up from the stream, the gun opened up, swathing down great numbers of Zulus and then, jamming just as the charge came in. (typical!).The Sikhs managed to hold the 1st assault on the interior wall but with casualties mounting and Zulus coming in behind them, the remnants made a dash for the Stone House where they grimly held on hoping for relief. The Gurkhas finally having dispatched my right horn, turned and drawing Kukris charged into my riflemen. There was a chance that these would panic but they stood firm and unleashed the most deadly fire of the game and then rolled well in melee.

We drew a veil over the scene as darkness fell.

18 Apr 2009 Scenario 18: None Shall Pass

This game was played solo using  40mm Elastolin Prince Valiant figures and Medieval Mayhem.

This was pretty straight forward with the mysterious Yellow Knight and his companion holding the pass. I figured that it didn't matter what made the other side of the defile so I used the shore of a deep loch (made for much easier access to the table!)

One by one the Yellow Knight laid low the Saxon chieftain, his standard bearer and 5 other Saxons! At last the Saxons had to fall back and ply their bows. Exhausted by an hour of hand to hand combat in heavy armour, the Yellow Knight fell back as the King's men came rushing to the rescue. After a brief exchange of arrows, the last of the Saxons were driven off.

As it turns out, the mysterious Yellow Knight was the young Prince Michael himself in disguise, engaging in battle for the 1st time and earning his spurs.

Sunday, October 16, 2011

24 April 2009 Scenario 19: Clearing a Trench (or not)

This game was played Solo using 15mm ACW figures and Hearts of Tin.


This scenario initially brought WWI trench warfare to mind but there is no mention of MG's and barbed wire so I thought perhaps an earlier example of siege trenches might serve. The easiest thing to hand was 15mm ACW and a few bits of earthworks that I had. This makes only the 2nd time in about 10 years that the lads have been out.

The rebs deployed with 2 regiments and 2 guns in the front line and a regiment split in two manning the place d'armes in the 2nd parallel. The Yankees deployed 2 regiments of Zouaves in the front line backed by 2 other regiments in a second line and supported by 2 batteries of off table artillery.

The 1st assault came close to breaking in but reinforcements were rushed forward and the attack thrown back. The Zouaves rallied but then failed an order to advance and suffered heavily in the ensuing firefight. The 2nd line passed through and charged but were also thrown back and the whole brigade being spent fell back. An engineer was over heard suggesting that a mine be dug under the rebel lines.

26 April 2009 Scenario 20: Initiative 1

This game was played by the 2 Jefferies Bickle and myself using my 40mm Elastolin Prince Valiant figures and Medieval Mayhem.


Scenarios 20 & 21 were played on the same day with Jeff taking the role of the Saxon warlord Helgin with his Pictish allies and his son Jeffery playing the role of Duke Stephen of Fulford in the 1st game and then, since Duke Stephen was recovering from serious wounds, Brave Sir Jeffery in the 2nd game. Naturally, I took the role of Prince Michael of Valdur. I had accidentally left my copy of the scenario book, most of the intended scenery and some non-military characters behind in the country so had to improvise with what I had and my memory.

The first game was setup with a border outpost overlooking crossing over the Malagorm River on the edge of Count Hubert's domain. When the vedette spotted a party of Pictish raiders emerging from the woods, they blew their horn as an alarm and closed up to deny the enemy the bridge. Initially they were successful but were overcome before the rest of the garrison could reach them. The young patrician in charge of the garrison had forgotten his shield in the confusion and when an arrow pierced him, the garrison scattered back. Luckily Duke Stephen, alerted by smoke from the beacon was at hand with more foot soldiers followed soon after by a patrol of mercenary Alans.

By now the raiding force had grown as Saxons and Picts came howling out of the woods. Arrows and javelins flew thick and blows were exchanges but Duke Stephen's men held one bridge and Prince Michael with a small handful of men the other. Alas a Pictish arrow slipped past the Duke's shield and found a weak point in his armour. Falling from his white horse, his men grabbed the body and dragged him to safety, abandoning the bridge. Prince Michael could do nothing but cover his wounded uncle's retreat.

26 April 2009 Scenario 21: Initiative 2

This game was played by the 2 Jefferies Bickle and myself using my 40mm Elastolin Prince Valiant figures and Medieval Mayhem.


The 2nd game followed on as Prince Michael led a renewed force to forestall a Saxon attempt to kidnap the Princess Kathleen who had been traveling to Fulford and had taken shelter in the forest tower. Michael sent the mercenary captain, Preisages galloping ahead with his horse archers, supported by Sir Jeffrey and a party of his grandfather's soldiers. Spotting a shortcut through the woods, he led his Valdurians into the dark forest. Helgin sent his Pictish allies ahead and a fierce cavalry battle broke out .

Before Helgin could come up, Sir Jeffery had joined in and slain the last of the mounted raiders and Preisages had galloped on to hold the bridge. Sir Jeffery stood beside him for a moment but on the approach of the dense columns of Saxon infantry, mumbled something about the Princess and galloped off to the tower where he lurked while Preisages held the bridge single handedly against a dozen Pictish spearmen. At last he slew the Pictish chieftain and the remainder broke and ran. Rearing his black stallion with a shout of triumph, he let down his guard and a cowardly Saxon archer hiding amidst the shield wall let fly and brought the great warrior down. Seeing this Sir Jeffery was struck with remorse and galloped forward over the bridge and threw himself upon the Saxons where he was soon dragged from his horse and battered senseless. Will Count Hubert ransom him?

While the fight for the bridge was raging, Helgin sent yet another warband forward against the Count's men and shield struck shield in a fierce melee, with a deft stroke the tribune struck down the Saxon warchief but these fierce raiders stood firm and a sudden unexplainable panic seized their enemy and ignoring the calls of their officers, they fled the field.

So where was Prince Michael you ask? It seems the forest track was not as wide and clear as it seemed and his scouts lost their way and Michael, apparently not doubting them, followed in their footsteps. He emerged to find himself behind the main Saxon force. Only the Raven Bearer and a handful of men stood in his way. With a shout Michael led his men forward but the lightly armed Saxons fled faster than Michael and his men could pursue. Pausing to get their breath, they looked to the tower and in dismay saw Sir Jeffery go down as Pictish tribesmen swarmed up the path to the tower whose door stood open.

Was the Princess within or had she fled? Helgin and his whole force now stood between Michael and the tower. There was nothing to be done but gather up the wounded and the catapult which had been dragged so far to so little purpose and retire to Fulford Castle leaving scouts to keep an eye on the Saxons.

5 May 2009 Scenario 22: Making the Best of a Bad Situation.

 This game was played solo using 40mm 19thC fictional armies and Hearts of Tin.

This is the 1st game played (solo) in my "new", renovations not quite finished, permanent wargames room.

A small division of the Red Queen's troops (3 battalions of line, 1 of light plus a battery of field artillery) are encamped beside the road through the Old Forest. A weary column of Blue troops is making its way down the road, Frontier Light Horse leading with a battalion of infantry, light infantry, guns and dragoons in a 2nd Brigade and 2 foot plus Blue Guards in the final brigade.

Red's artillery quickly brought their guns into action as Blue's lead brigade deployed, cavalry masking the advance of the 3rd infantry down the road. Under a heavy fire the light horse charged, it was nip and tuck but eventually the fencibles repulsed them and musketry and canister sent the remnants fleeing. The Victoria Rifles crested the hill backed by the Green Tigers while the Buffs headed into the woods to block the road. Blue had some problems getting his 2nd Brigade on line but eventually the 2nd Dragoons pushed the rifles off the hill and sat there for the rest of the game eyeing the Red square protecting the flank of the guns.

Blue's artillery finally made it forward and opened a heavy fire on the fencibles driving them back into the woods then turning on the Red guns. These refused to be drawn into counter battery and continued to lash out at Blue's infantry until battered into silence. On the right, a brisk counter attack by the Buffs drove off the 3rd infantry just as the Blue Guards came up. Supported by 2 line battalions, these drove the Buffs slowly back through the woods, both Brigadiers going down in the fight. The rifles fell back and joined the fight but eventually numbers told and General Turner was forced to order his remaining forces to retire leaving Blue the road through the forest.

20 May 2009. Scenario 23. Hostage Rescue (1) or '6 months in a Pirate Lair'.

This game was played solo using 40mm 19thC Fictional troops and Hearts of Tin


This scenario was obviously designed as a modern skirmish game. My first thought was to stay skirmish and switch it to Prince Valiant with a dragon ship substituting for the helicopters, but having HofT on the brain I thought perhaps a VSF balloon airship would do, but I haven't built any yet, so......steam boats on the river, the 19thC equivalent of helicopters.

It seems the pirates were upset by the capture of Freeport (see scenario 15) but not dispersed. The capture of Lord Dennis C Walts, an important officer of the Faraway Trading Company Fleet, and his Lady Veigh Enna, has led to a rescue mission led by Colonel Pointer of the Fencibles acting as Force Commander. The pirate garrison consisted of 4 companies of Spearmen, 6 of light infantry, and a light gun with 2 crew, all classed as Veteran Irregulars. Their starting position as well as that of the hostages was decided upon by shuffling and deploying cards which were not revealed until Red's forces were able to spot them. (In either words I treated all 4 potential hostage cards as real ones etc..)

The relief expedition which was carried on 2 unarmed river steamers, was composed of a company of Victoria Rifles, the grenadier companies of the Buffs and Green Tigers, a company of volunteers, a light rocket battery and a light gun, each with 2 crew. Once again the pirates proved to be both tough and lucky.

It is possible that the Red Queen's forces could have suffered a worse string of luck, but it wouldn't have been easy. On the right bank Colonel Pointer left the gun to batter the stone warehouse while he led the Grenadiers and Volunteers in a brave charge across the fields. Tripping over the muddy fields and evidently still seasick they did manage to drive many of the pirates back but cut down by cannister and gun fire and stoutly resisted in melee, they were surrounded and finally Colonel Pointer's twice wounded body was dragged off to join Lord Dennis in captivity.

On the left bank the Queen's troops did drive the enemy out of the first stone house and eventually inflicted serious casualties but suffered heavily themselves and barely a company's worth of troops ever re-embarked.
Stay tuned

26 May 2009. Scenario 24. Hostage Rescue (2) or 'Bad luck is better than none'

This game was played solo with 40mm 19thC Fictional armies using an adaptation of Medieval Mayhem.


Following the failed rescue event, (see previous game) the pirates moved their prime hostage inland to a sequestered vale containing 3 hamlets each with 2 buildings.


 The hostage was secretly assigned to one house by the simple expedient of dealing 6 cards face down with the Queen of Spades indicating the hostage position. Captain Deadeye and 11 pirates were assigned as guards, 2 to a house to confound the Queen’s men. Captain Blunt, of the Devil’s Own, volunteered to lead a rescue party and was given a sergeant and 4 riflemen of the Victoria Rifles. This elite group, equipped with shooting, melee and morale bonuses, split into 2, crept up through the woods and checked out 4 of the houses. No hostages but the 8 guards were alerted and in a running fight, 2 pirates were killed along with the bold Captain Blunt, the blundering Sergeant Piper and Rifleman Tweed while 2 other riflemen skedaddled (since this required a 6 followed by a 6, it was naturally no surprise). The lone remaining riflemen, eyeing 10 pirates converging on his hiding place in the woods, took a quick vote and decided to report home for further orders. A fund drive to collect a ransom for Lord Dennis and his wife is underway

26 May 2009. Scenario 25. Chance Encounter 1

This game was played solo using 40mm fictional armies and Hearts of Tin.

A foggy grey morning on the banks of the St Croix finds the advance guards of the opposing armies groping their way towards the bridge at Victoriaville to secure crossings for the upcoming campaign season. The Frontier Horse are obviously better scouts that Larsen’s Lancers and have found their way to the outskirts of town by the time the mist lifts to reveal the enemy just marching onto the field.

Seizing the initiative, General Ross ordered the Frontier Horse and 1st Dragoons to cross over and hold back the approaching enemy. The 1st foot was ordered to follow and seize Victoriaville. The 2nd infantry deployed to hold the center and support Battery B which unlimbered and opened fire on the dense red masses across the river. In the rear, the 3rd Infantry and Grey Volunteers were ordered to cross over the old bridge to seize Stone Farm.

Across the river, General Turner, finding himself humbugged, sent the Lancers and the Director General’s Bodyguards forward to see off the Blue cavalry and ordered the Buffs and Tigers to deploy, drive off the enemy infantry and seize the Old Bridge. He ordered the Victoria Rifles and FTC Horse Artillery Rocket Battery to drive off the enemy artillery and the Fencibles to support the cavalry.

At first everything seemed to be going Blue’s way, they seized both objectives on the 1st turn and the Frontier Horse not only repulsed the lancers but followed up, driving them back and pursuing into the Bodyguard who are forced back as well. The day was not over though and the Bodyguard rallied in time to meet the Dragoons. After a fierce melee, the Bodyguard was forced to retire behind the Fencible's square but Blue’s cavalry brigade had also suffered 50% losses and had to pull back. In the center, the rockets found the range and a hail of rifle and rocket fire devastated Battery B. By the old bridge, while the 3rd infantry and the Tigers hammered each other with close range musket volleys, the Buffs came forward and smashed into the Volunteers driving them pell mell back across the bridge. Two thirds of Blue’s Brigades were now shaken and General Ross decided to pull back and regroup. (ie he failed his General Morale Test)

14 June 2009. Scenario 26. Civilian Escort

This game was played Solo using 40mm 16thC armies using Rough Wooing.


This is an unusual scenario and it took me awhile to think of an appropriate background which I had figures for. I settled on mid-16thC Scotland. The English were trying to normalize their occupation and wanted the Scots to accept them, sell food & labour to their garrisons and so forth, the Scots government naturally objected. Here, the Duke of Albany has taken 6 companies of pike and 3 of shot to escort 12 'companies' of civilian families, sheep, cows, carts and wagons out of the English clutches. The English have dispatched Sir Robert Bowes with 4 companies of border horse and 2 of mercenary mounted arquebusiers to turn them back.

The English cavalry was across the board in a flash and blocked the pass but an interesting problem arose, charging pikes frontally with light horse looked fairly suicidal and the Scots pike were prohibited from charging cavalry, due to the 3" rule, neither side could just slip through any gaps, they would have to go the long way around, but that would leave someone out of command control.

Both sides brought up their arquebusiers but today the Scots had a deadly aim while the mercenaries appeared to have let their powder get wet. All the noise and excitement had its affect on the civilians who scattered in all directions before being carefully herded back in to the centre. As the Scots fire took its toll, Sir Robert decided that charging the arquebusiers would have been a smart move, even if they had evaded behind the pike, it was too late and he himself was shot down and the 3 remaining companies scattered to the wind. 6 turns had gone by, had the delay been enough? The various groups of women, children, sheep, cows and wagons were herded back together and stepped briskly down the board, exiting by turn 11 with a turn in hand.

23 June 2009. Scenario 27. Attack on a Stockade

This game was played solo using 40mm AWI figures using Hearts of Tin.


Here was another scenario crying out for single figures and skirmish rules, and I actually had both, I just didn't feel like using them. So, I just doubled the shooting ranges in HofT and declared each base to be an average of 25 men, women children or cows which gave me: 1 unit of rifle armed frontier scouts (veteran), 3 herds of cattle, 5 stands of armed civilians with the "wimmenfolk' loading for their men. I also added a hospital run by a suitable matron assisted by a young lad with bucket. So a settlement of some 150 souls, attacked by a 9 stand raiding party of 150 Indians and 75 Butler's Rangers (veteran militia) . The raiders were out to capture the stockade and destroy all supplies and spoil the harvest.

The settlement was alert and spotted the raiders when they were barely on the table (flock of crows? stray dog?). The Reverend Black had to sortie forth to urge the cattle and field workers in but the sound of musket fire seemed to spur them on and eventually the cattle and people were all in and the gate slammed shut.

The fire was hot and heavy with a surprising number of 6's and before long the riflemen were all down to the hospital cabin being patched up. A rush by rangers and indians, clambering up on each other's shoulders, almost took the empty stockade wall but the Reverend led a a group of anxious settlers forward and in a brief scuttle, drove them back. More musket fire pounded the walls and soon settlers were streaming down to the infirmary  Eventually a makeshift company of wounded frontiersmen and settlers made its way back up onto the wall.

Another rush at the wall saw Michael Butler stretched out momentarily by a blow to the head. More musket fire followed as the indians and rangers wavered but soon Butler was back on his feet and covered by a fierce fire led yet another rush which drove back the riflemen. Then disaster struck the setttlers, in the confusion on the wall the Reverend found himself surrounded by rangers and recognized by a Tory ranger who was once a neighbor, and taken prisoner. As the raiders started to pour over the thinly manned stockade, casualties amongst the defenders grew and suddenly Farmer Brown had had enough, grabbing his wife and daughter he ran for the gate, moments later the whole settlement was fleeing in terror covered by the last few riflemen. By dawn there was nothing left but a smoking ruin as the raiders melted into the forest.

7 July 2009 Scenario 28: Raid from a Fort.

This game was played solo using 40mm 16thC figures and Rough Wooing.

Something about the fortress on the map combined with siege batteries said "16thC" to me so here we are in France with the English behind the walls of the town of Belmont being besieged by the nobles and mercenaries of the King of France. 4 companies are placed for each unit of infantry or cavalry.

As another dawn approaches, a sally port slides quietly open and 6 dice rattle across the table allowing the English border horse to sneak 18" across the table without being seen, just 3" short of the battery position. Confusion strikes the English as the French guns open fire (sighhh, yet another cautious light cavalry commander leading a raid). As the French scramble to arms and rush piecemeal to the rescue, the English archers spread out to cut off any relief attempt, the sword & bucklermen rush the gabions and the border horse spur forward to distract the Landsknecht pike. The gun unleashes a hail of fire (tied melee) while the cavalry teases the pikemen (no hits either side). An amazing melee now takes place as turn after turn the dice fly as additional English troops join the fight but with as many as 9 dice being rolled at one point, turn after turn, no one can roll higher than a 3.....twice leaders are unhorsed....

Meanwhile, the French shot begin to pick away at the English bills who have deployed to cover the retreat of the storming party while heavy lancers come thundering forward led by the Sieur de St. Lambert in person. A first charge is chopped apart by billmen and at last the English foot scrambles over the gabions, slaughters the gun crew and drives back the supporting Landsknechts. A rush back to the gate takes place but Sir Perry, in command of the English foot, is forced to stand and cover the press of fleeing men. The weight of armoured lancers is too much and he and his band are ridden over. The lancers press on and cut down more English, pulling up only when the portcullis drops in their faces.

As the remnants of the sortie musters inside the gate, the Earl tallies his losses. According to his counselors, Grant & Asquith, he could afford to lose 25% of the sortie and still call it a success, 12 stands went out, 9 came back. He looks over the wall at the gaping pit where the French battery had stood at dawn and smiles grimly.

15 July 2009 Scenario 29: Raid on a Train.

This game was played solo using 40mm 19thC Fictional armies and Hearts of Tin.

A July afternoon in the Rahdon Hills, the Oberhilse Frontier Light Horse have been patrolling the new rail line that the Fahrway Trading Company has built from their mines in the disputed territory to the headwaters of the East Wye River, suddenly they see one of the new fangled steam engines sitting idle, guarded by a detachment of Faraway regulars, the Buffs. Flashing off a heliograph message to the 1st Dragoons requesting support, they deploy into line, send out skirmishers and descend towards the train. The long roll sounds from the camp as the red coated soldiers grab their muskets and fall in.

A few shots ring out as the frontiersmen fire their long rifles from the saddle while the main body aligns them selves as if for a charge. A terse command rings out and the Buffs smoothly form square. The frontiersmen are brave fighters but charging squares is not their idea of warfare, they trot closer and pull out their rifles. In the square, Colonel Pointer watches the slow drain of casualties with concern while scanning the western horizon for some sign of the rescue train that he is expecting. At last he decides that the horsemen do not mean to close. He orders the Buffs into line and advances expecting the horsemen to fall back. Surprisingly, they stand as if pinned, all but the skirmishers who pull back behind a patch of woods, he orders a devasting volley and the horsemen finally ride back out of range.

 Suddenly from behind, there is a commotion, the light horse skirmishers have ridden around the woods and are about to swarm onboard the empty train. Another crisp order sends the light company doubling back towards the train while the main body falls back slowly in line. A cheer goes up, there coming around the bend is a train bristling with the bayonets of the Green Tigers. Time has run out, the light horse dash forward firing from the saddle but another sharp volley sends them to the right about. Two hours later, the Blue Dragoons wend their way through the hills and scrub woods but they are too late, the enemy is gone.

5 Aug 2009 Scenario 30: Clearing out the Rebels.

 This game was played solo using 40mm 16thC armies using Rough Wooing.


The Duke of Argyle's political scheming had gone too far and he had to gather his Campbell clansmen around him and retreat to the traditional cave in the Highlands (center background behind the gun), pursued by the forces of the Regent. To provide some element of surprise and uncertainly, I deployed the 5 Campbell companies by shuffling 5 cards and 5 blanks and deploying them into various hiding places, then did the same with the Duke and artillery. The cards moved like actual units until seen in the open or until an enemy came within 3" at which point the card was flipped over and replaced by the unit or removed. The Regent deployed Lord Home and 2 Border Horse on the right followed by the Regent's Battle with 6 pike and 3 shot. On the left were German mercenaries provided by the French King to fight the English. (oops) 6 pike, 3 shot and a light gun.

The Germans advanced and stormed a stone farmhouse only to find it empty. They pushed some shot forward but the cautious Captain Duhn stopped several times and the right wing was heavily engaged by the time they finally proved that no highlanders were on their flank at all and turned to the center.

On the right, the Borderers rode forward scouting out various bits of cover and chasing a few outlying Highlanders back. One company got a bit carried away and charged into some clansmen in the open but were hit by the first effective fire of the game and after a prolonged struggle were chopped apart by superior numbers of fierce clansmen. Home led the rest of the borderers forward and rode over the unfortunate highlanders who had made the mistake of trying to run to cover.


The battle on this flank then settled into prolonged sniping between Highlanders in cover backed by a light gun and the Regent's arquebusiers support by the cavalry. Eventually the remaining Regent's men pulled back while Home, his command reduced to his own personal bodyguard, spurred forward and almost cut down the Duke in hand to hand combat before falling himself. In the center, charge after charge on the white cottage was repulsed until finally the Germans added their weight to the attack. The Regent's men suffered heavy casualties but as the Highland casualties grew, parties of clansmen started slipping away until only the Duke and his bodyguard were left. These stood bravely until a German arquebusier found his mark then the wounded Duke was carried to safety in the mist covered hills.

11 Aug 2009 Scenario 31: Raid from the Sea

This game was played solo using 40mm 16thC figures and Rough Wooing.


A light mist covered the harbour as several longboats crammed full of English soldiers and sailors slipped past the Spanish batteries and entered the harbour. There was barely time for the alarm bells to ring before the first soldiers were swarming up onto the deck of the Santa Teresa, the crew, spilling out of their hammocks resisted manfully but soon smoke was billowing from the hold as the English tumbled back into their boats and looked for their next target. The 2nd boat landed its load between the Customs house and the bell tower battery as the garrison lancers came galloping up the road.

Quickly forming up, a flurry of arrows decimated the lancers as they charged. As more English swarmed ashore, one party broke into the custom house and despite prolonged resistance by the agents, drove them out and set fire to it while another company battered down the rear gate of the bell tower battery and put the gunners to the sword. A body of mercenary pikemen formed up and charged but as the bills slashed down, they faltered and then scattered, running for the hills. The rest of the garrison had not been idle and soldiers and militia were soon swarming up the main road from all around the town, unleashing a hail of fire. A charge by the local militia saw some success until their Captain was struck down.

Taking advantage of the respite, the English slipped back onto their boats and rowed across the harbour. A small garrison had been left in the barracks and they sold their lives dearly but soon more smoke was rising above the town. As the main body of pikemen trudged tiredly back around the harbour, the English assaulted Old Battery but against all expectation, the garrison put up a stout resistance. A thin line of archers formed across the rear of the assault party as the main body of the garrison approached. A cloud of arrows rose up and down as the swivel guns on the boats opened up on the dense mass of pikemen. A few brave men tried to push forward but none made it as far as the waiting line. Moments later, the battery garrison surrendered. Porto Nueva was no longer a threat.

30 Aug 2009 Scenario 32: Amphibious Assault

 This game was played with Ron Porter using his 1/72nd WWII figures and Blitzkrieg Commander.

Sicily, 1943.

Ron took charge of the German defences, 9 infantry, 2 MG's, 2 mortars,2 HQ, a FAO with 2 offtable guns (big ones I think), a CO, a pillbox and acres of mines and wire, well maybe not that much. I took the rather green Yanks the 1st wave had 9 infantry (Able, Baker & Charlie companies), 2 mg's, 2 mortars, 2 engineers, 2 Lee tanks, 2 incompetent HQ's and an energetic CO who had to rush up and down kicking butts and hauling guys off the beach all game. Oh yes there were also 2 lovely HUGE naval guns with lots of assets which I pretty much wasted. The 2nd wave which waited until turn 5 was the same but only 1 HQ plus a naval FAO. The brown hill on the left rear was designated a minor objective and the bridge in the right rear as a major one. My too clever plan was to concentrate on my left and swing around the wood hopefully bypassing most of Ron's defences.

Well, even if Ron's artillery and the MG in the stone house, where his FAO also was, hadn't destroyed Able and most of Baker companies as well as both MG's, I was having trouble even reaching the hill, my guys kept taking smoke breaks once the CO became preoccupied with the 2nd wave. Since the 2nd wave was late, I redirected it to the opposite flank for the direct run. I lost more boats on the way in including 1 tank and the whole battalion stalled on the water's edge.

My CO had to make the dash across the width of the beach to get them moving. But, with an observer, the naval guns were useful and weakened the pillbox (small bunker) enough that the Lee was able to take it out with a few well placed shots and the way was open for the remnants of Dog, Easy and Fox to advance on the next stronghold .That was pretty much the high point of the game for the Yanks. They were fast approaching their breakpoint but not the objectives and time was well up.

17 Sep 2009 Scenario 33: Harbour Raid

This game was played solo using 40mm War of 1812 armies and Hearts of Tin. 
The day started well for the British, their boats entered Newport unseen and landed the 41st foot and a party of sailors with a light gun at the foot of the American shore battery, the Canadian fencibles and 2 companies of light infantry on the harbour's edge and 2 companies just beyond the pier. The local militia and volunteers put up a surprising fight though and while the light infantry and fencibles eventually cleared the eastern shore, they suffered heavy casualties and could go no farther. 
The 41st split up, 2 companies under their Colonel rushed the rear of the battery while the rest of the force engaged  the US 4th Infantry which had barricaded themselves in town. Under a heavy fire, the British were unable to break down the gate to the battery and when the Colonel fell the remnant rushed back to the boats, rallied briefly then retired again under a hot fire. At about the same time, on the Eastern shore, the wounded General Turner was carried back  to the longboats and ordered the retreat of the remaining forces.   

18 Sep 2009 Scenario 34: Surprise 1)

This game was played solo using 40mm 16th C armies and Rough Wooing.

The English with a large force including a large number of Landsknechts and other mercenaries has trapped a small Scottish force against the Meander River. Luckily for the Scots, the mercenaries pay is late and the French are at hand with gold. A die roll settles that it is the right wing of the English army that will change sides. (Technically, this forthcoming betrayal was unknown to the English so this called for a little "lets pretend I don't know".)

On the English left, an impetuous charge of border horse sweeps away a few skirmishers but is wiped out in a fierce fight with the main body of Highlanders. These, however, are badly cut up and lurk for the rest of the battle till driven off by arquebus fire. In the center, once it becomes clear that the Germans on the right are not just hanging back due to command control failures but actually changing sides, one battle of bills and bows are turned to face them while the heavy cavalry swings forward to flank the Scottish pikes as the main battle of bills and bows advances. The Scottish cannon take a heavy toll of the Whitecoats but are eventually silenced by bow and cannon fire.

On the Scottish left, the border horse first retreat off to the far flank then swoop in to charge the English heavy cavalry from behind while a handful of Scottish arquebusiers snipe at them from the woods. Fortune favoured the Scots this day and between lucky shots and lousy morale tests, the small force of English cavalry including the General is driven back and then routed. For a moment it looks like the Redcoats will hold off the treacherous Germans on the right while the faithful Landsknechts on the left will save the day but their Cautious commander refuses to advance and as the Regent leads the Scottish pikes forward, the Redcoats crumble and the whole English line comes apart. Scotland is saved yet again

20 Sep 2009 Scenario 35: Surprise 2

This game was played solo using 40mm 19thC fictional armies and Hearts of Tin.


I rather thought the timeframes and movement rates might be a problem with my rules but I was tired and ..... anyway I decided to push on as written. The Oberhilse force consisted of the 1st Dragoons, Paipur Tigers, Frontier Light Horse, 1st Infantry and a handful of skirmishers. Each bridge was held by a company of the Green Tigers while the rest of the tigers, fencibles and Buffs supported by Lancers and a battery of foot artillery held the town.
The skirmishers had crept into the wood by the eastern bridge and opened a heavy fire on the bridge guard while the 1st Infantry rushed across the table in column. The cavalry followed behind them, keeping a wary eye on the town but by the time the gun was manned and turned about and the garrison turned out, the bridge had been over run. A few stray shots followed as the raiders rode off having lost a single company of light cavalry to enemy fire

4 Oct 2009 Scenario 36: Night Attack-1

This game was played solo using 1/72nd 19thC fictional armies using Hearts of Tin. 

In order to get more games going, I decided to bring back some smaller figures and a few scraps of terrain and set up another small (4x5)  gaming table at the kennel. One of my old 15mm armies seemed like the obvious choice but I've just started work on some 20mm plastic RCW and have been casting a nostalgic eye on some Airfix ACW figs I painted up 25 years ago  during an earlier nostalgic bout, soooooo ...... 

It is 1863 and civil war is raging in Oberhilse. A brigade of Republican troops in their blue uniforms are camped by the Blubagh Run. Six companies plus a squadron of dragoons are on guard at the Western crossing in case a threatened Rebel night attack materializes, 4 more companies plus a field gun are in camp while 3 more squadrons are en route. The Rebels are indeed on the march but they are aiming at the Eastern ford, 2 squadrons of light horse, 16 companies of infantry divided into 2 brigades and a field gun. This would have been a good game for a GM,  map moves and written orders or at least a programmed enemy but the night rules and control test  caused lots of mayhem as it was.

The Rebel 1st Brigade managed to cross easily but the 2nd Brigade went haring off to the west on its own initiative. The 1st fight of the game came as a single squadron of dragoons dashed itself against the rebels as they deployed from the crossing and was cut down to a man. (oops) Behind them the blue infantry formed line with the 3rd Infantry in reserve. Across the run, the Rebel 2nd Brigade deployed to cross the run behind the blue line. The 3rd Infantry was ordered up and advanced into melee range leading to a fierce musketry duel across the run. 

Feeling the onus to attack, the Rebel commander ordered the 1st Brigade forward and the blue force was caught in a nasty 2 way fight but with the advantage of 1st fire and the gun, threw back the 1st Brigade. The regiment of rebels on the far side, backed off voluntarily after being shaken by losses. After a brief pause, the rebel lines came forward again just as the remaining dragoons spurred forward to attack the 2nd Brigade. (not sure why...)  The rebel unit composed of volunteers from the northern mountains, fired high, broke and were ridden down but enough dragoons were hit to shake the cavalry brigade. As the rebel infantry renewed their attack, the rebel light horse flanked the blue line and the 2nd Infantry broke and scattered and the whole blue line fell back in considerable disorder. The rebels were just as badly battered however (all brigades on both sides were now shaken) and also had to fall back.

5 Oct 2009 Scenario 37: Night Attack - 2

This game was played solo using 40mm 19thC Fictional armies and Hearts of Tin rules.


After Blue's successful raid (see scenario 35) a full scale invasion was launched. General Turner was tasked with holding them at Long Ridge. Near dawn on the 5th of October, alert sentries reported the sound of moving troops and the army was turned out. The Buffs occupied Sutherton with the Tigers and 'A' Battery on their right. The York Volunteers occupied Norville with the Fencibles to their left and the 41st Foot in reserve. As the morning mist lifted the enemy could be seen approaching, dragoons and the Oberhilse field force to the south east, volunteers and regulars to the south west.

Realizing the futility of opposing a division with a single regiment of lancers, Larsen's Horse were called back and the brigade concentrated behind the center while the 41st foot and Fencibles were hastened to form a defensive line to the east of Sutherton.

Across the field, General Ross regarded the mess of woods and villages in front of the Dragoon brigade and ordered them to the opposite flank. General Tabor, in command, was a capable officer but never one to hurry and the battle was well joined before he completed the move. General Zinn, however, had the bit between his teeth and without giving the artillery time to fire more than a token shot, rushed his brigade forward. A series of fierce fire fights resulted in the Red infantry being slowly forced back over the course of the day, all the way to Norville.

In the center, the Oberhilse regulars rushed forward to attack Sutherton, supported by volunteer artillery and the Frontier Horse. Between the rapid and accurate fire of 'A' battery and the steady Red infantry, the supporting forces were shaken and thrown back to be followed by the bluecoats despite their initial success in seizing the outskirts of town. This was not without a cost however, and the remains of the 1st Brigade were unable to hold back the Volunteer brigade when it renewed the attack. By now the Dragoons had come up and they swept up the hill to be met by the lancers. After a bloody but indecisive melee, the remaining lancers fell back as the supporting Bodyguard charged in, shattering the dragoon brigade and driving them back. Before they could capitalize on their success though, the advancing volunteers unleashed a devastating volley into their flank and General Turner was forced to order a retreat

24 Oct 2009 Scenario 38: Night Patrols

This game was played using 40mm AWI figures and Hearts of Tin by George, Gary & Martin vs Lawrence, Jerry and myself.  


I decided to take the suggestion and fight this as a 2 part game, the patrols and then the ensuing fight.

The Americans (5 continentals, 2 militia, 1 rifles and 2 guns) were laid out on along the hill line then replaced by cards with an equal number of dummy cards. The stationary outposts (1 company each) were marked with a clump of lichen and the moving patrols put on the table and forced to move full along their designated paths.

The British then deployed their patrols 1 company each of Mohawks, Rangers and Light Infantry. These had to dice each turn for deviation unless following a terrain feature such as the river. They were allowed a slight chance to detect but not identify the enemy at 12", a better chance to identify at 6" and automatically found them at 2" (melee range).

On the British left the Mohawks snuck by the patrols, identified some artillery and continentals and then stumbled into a sleeping militia battalion. After a confused exchange of shots they slipped back into the gloom. On the right the light infantry got into a fight with a patrol of riflemen soon reinforced and were eventually driven off. In the center  the rangers slipped past all patrols and mapped out the center of the US position. At this point, with 9 of 10 units spotted the game was ended and the British given the option of a night attack or an assault at 1st light. Having had enough stumbling they waited for dawn while the rebels were put back into their positions and the outposts recalled at dawn.

In a surprise move, the British pushed their artillery and regulars (2 grenadier battalions, inc 1 Hessian and 2 line regiments through the defile between the woods and farm and assault the rebel left, screened by Canadians, Indians and Loyalist rangers on either flank. It was a near run thing as the Rebels rushed troops from the center but at the end of the day the assault was repulsed.

Over the years this pseudo-campaign has straggled on the score was now:  Nova Scotia Rebels 5 British 0.

5 Nov 2009 Scenario 39: Helicopter Operations

This game was played solo using 1/72 fictional 1960's armies and Morschauser's Modern Rules. 
Since I still haven't built a VSF Balloon corps, I had to resort to actual helicopters. I was planning to use Cold War Commander but thanks to http://wargamingmiscellany.blogspot.com/ I decided to play using Joe Morschauser's modern rules, straight up.  I couldn't think of why a Roscian patrol would have been inserted into Naryatria so the latter became the aggressor. I put an Local Defense Force (LDF) stand in each village and placed a roving patrol randomly. I then divided the table into 6 areas and rolled to see in which one the 2 stand Naryatrian patrol from the Rhino Regiment was hidden and assumed that their position had been betrayed by a flock of crows or what have you. Once fire was opened, each side diced each turn with a score equal to or less than the turn number indicating that their helicopters had shown up.
The LDF closed in piecemeal and the Rhinos opened fire opened fire with deadly effect. As more LDF closed in, a Rhino went down and the remaining stand pulled back into cover breaking the line of fire. A stalemate ensued until 2 helo's full of Lion Brigade Commandos arrived to cover the remaining Rhinos as they headed for the evac helo. As they boarded,  a squadron of Roscian helicopters flew in low and debouched 6 stands of Newpore Lancers.  The Lions opened up while the evac helo loaded but the return fire from the Lancers cut them to pieces and only 2 stands made it back aboard their rides.
The rules worked like I remembered, fast & bloody.  If I were to play the scenario again, I would double the number of stands.